Usage
Installation
pip install simplisafe-python
Python Versions
simplisafe-python is currently supported on:
Python 3.10
Python 3.11
Python 3.12
SimpliSafe™ Plans
SimpliSafe™ offers several monitoring plans. To date,
simplisafe-python is known to work with all plans; if you should find differently,
please consider submitting an issue.
Accessing the API
Starting in 2021, SimpliSafe™ began to implement an OAuth-based form of authentication. To use this library, you must handshake with the SimpliSafe™ API; although this process cannot be fully accomplished programmatically, the procedure is relatively straightforward.
Authentication
simplipy comes with a helper script to get you started. To use it, follow these
steps from a command line:
Clone the
simplipyGit repo andcdinto it:
$ git clone https://github.com/bachya/simplisafe-python.git
$ cd simplisafe-python/
Set up and activate a Python virtual environment:
$ python3 -m virtualenv .venv
$ source .venv/bin/activate
Initialize the dev environment for
simplipy:
$ script/setup
Run the
authscript:
$ script/auth
Hit the Enter key to open a web browser to the SimpliSafe login page:
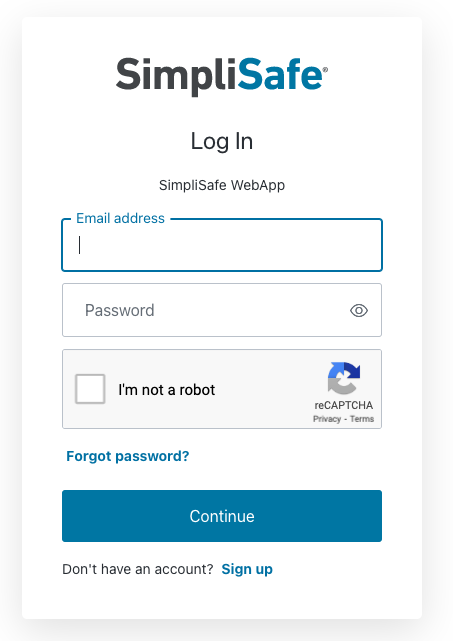
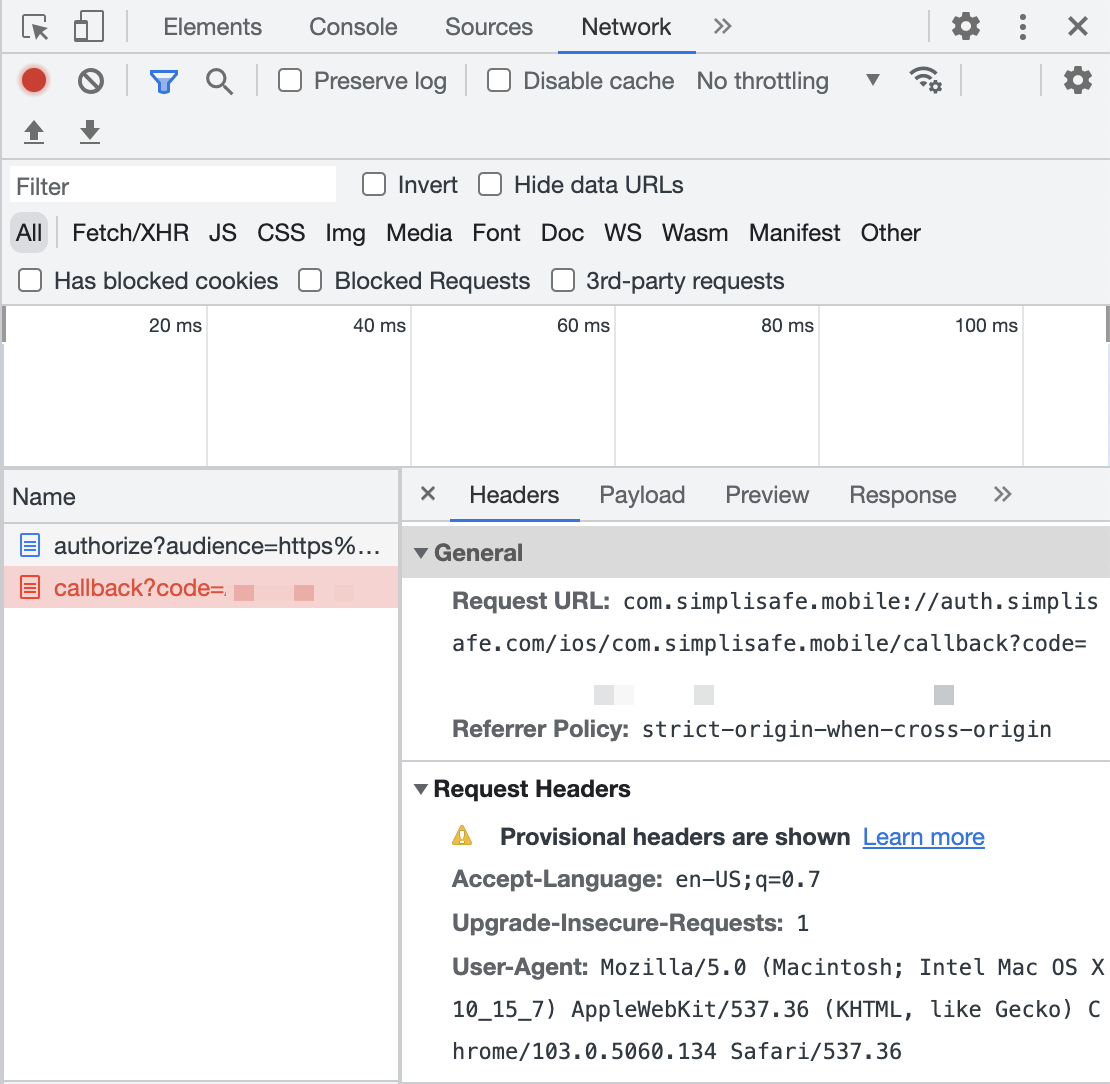
Once you enter your username/password and click “Continue”, you will receive a two-factor authentication request. Depending on your account settings, this will arrive as either (1) an SMS text message or (2) an email. Follow the provided instructions regardless of which form you receive. Once you complete the verification, return to the browser and open its Dev Tools window. Look for an error (in either the Console or Network tab) that contains a URL starting with
com.simplisafe.mobile:
com.simplisafe.mobile://auth.simplisafe.com/ios/com.simplisafe.mobile/callback?code=<CODE>
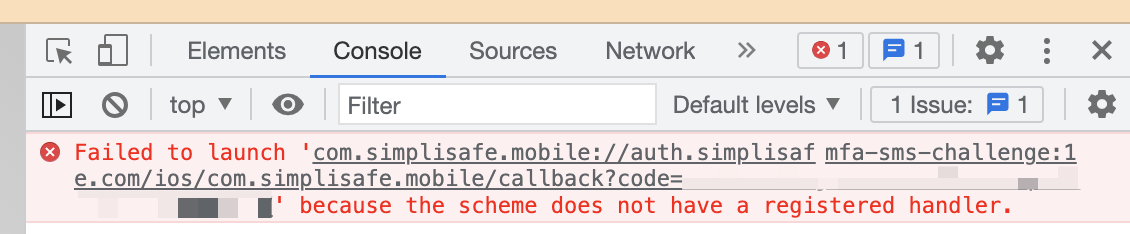
NOTE: This process is very inconsistent with non-Chromium browsers (Chrome, Edge, Brave, etc.); if you are unsuccessful at finding the code, try a Chromium-based browser.
NOTE: if you have already logged into SimpliSafe via the browser, you may be sent
straight to the end of the process. This can present a challenge, since opening Dev
Tools in that window won’t show the previously logged activity. In this case, open a new
tab, open its Dev Tools window, then copy/paste the URL from the tab opened by
script/auth into the new tab to see the Console/Network output.
Copy the
codeparameter at the end of thecom.simplisafe.mobileURL, return to your terminal, and paste it into the prompt. You should now see this message:
You are now ready to use the SimpliSafe API!
Authorization Code: <CODE>
Code Verifier: <VERIFIER>
These values can now be used to instantiate an API object.
Remember that this Authorization Code and Code Verifier pair (a) can only be used once
and (b) will expire after a relatively short amount of time.
Creating an API Object
Once you have an Authorization Code and Code Verifier, you can create an API object like this:
import asyncio

from aiohttp import ClientSession
from simplipy import API


async def main() -> None:
    """Create the aiohttp session and run."""
    async with ClientSession() as session:
        simplisafe = await API.async_from_auth(
            "<AUTHORIZATION_CODE>",
            "<CODE_VERIFIER>",
            session=session,
        )

        # ...


asyncio.run(main())
Key API Object Properties
The API object contains several sensitive properties to be
aware of:
# Return the current access token:
api.access_token
# >>> 7s9yasdh9aeu21211add

# Return the current refresh token:
api.refresh_token
# >>> 896sad86gudas87d6asd

# Return the SimpliSafe™ user ID associated with this account:
api.user_id
# >>> 1234567
Remember three essential characteristics of refresh tokens:
Refresh tokens can only be used once.
SimpliSafe™ will invalidate active tokens if you change your password.
Given the unofficial nature of the SimpliSafe™ API, we do not know how long refresh tokens are valid – we assume they’ll last indefinitely, but that information may change.
Creating a New API Object with the Refresh Token
It is cumbersome to call
API.async_from_auth every time you want a new
API object. Therefore, after initial authentication, call
API.async_from_refresh_token,
passing the refresh_token from the previous
API object. A common practice is to save a valid refresh
token to a filesystem/database/etc. and retrieve it later.
import asyncio

from aiohttp import ClientSession
import simplipy


async def async_get_refresh_token() -> str:
    """Get a refresh token from storage."""
    # ...


async def main() -> None:
    """Create the aiohttp session and run."""
    async with ClientSession() as session:
        refresh_token = await async_get_refresh_token()
        api = await simplipy.API.async_from_refresh_token(
            refresh_token, session=session
        )

        # ...


asyncio.run(main())
After a new API object is created via
API.async_from_refresh_token, it
comes with its own, new refresh token; this can be used to follow the same
re-authentication process as often as needed.
Refreshing an Access Token During Runtime
In general, you do not need to worry about refreshing the access token within an
API object’s normal operations; if an
API object encounters an error that indicates an expired access token, it will automatically attempt to use the refresh token it has.
However, should you need to refresh an access token manually at runtime, you can use the
async_refresh_access_token method.
A VERY IMPORTANT NOTE ABOUT TOKENS
It is vitally important not to let these tokens leave your control. If exposed, savvy attackers could use them to view and alter your system’s state. You have been warned; proper storage/usage of tokens is solely your responsibility.